Monday, October 13, 2014

Creating a Batch Script for AutoCAD with CadTempo

Have you ever found yourself with a large number of AutoCAD drawings that you need to make changes to? It can be a very tedious and time consuming task.


AutoCAD comes equipped with a number of tools that can address this situation. The most simple of these is the script file - which also works with AutoCAD LT. I've used this method many times in the past to process hundreds of drawings at a time. When left to its own devices, the editing time that CadTempo had captured for those drawings was lost. In order to eliminate that problem a script generator was added to CadTempo. This article describes how to create a batch script within CadTempo and reclaim that logged time.


First, we need to enable and display the script maker. Open the CadTempo viewer and navigate to Options, then the Setting tab. Check the checkbox labeled Show Script Maker as shown in the image. *If you operate a different CAD program this will not be enabled. If your CAD program has scripting available please let us know and we will investigate adding its functioning.*


The AutoCAD Script Maker will now be visible when you return to the Files window and you can begin creating your AutoCAD script template.


CadTempo populates the script edit box with a basic script template. You can modify this script to suit your needs, or load a previously saved template. You'll notice there is a placeholder named Filename. When the batch script is created this will be replaced with the drawing names that you select for processing. Once you have determined the script template is functioning properly in AutoCAD you can save the template for future use.

Select the Drawing Files

If you already have multiple folders checked for other viewing or reporting purposes, you can save the current check list for later reloading. From the main menu bar go to File>>Save Check List. Now you can click the Clear Checked button. The button label will change to "Oops..." to immediately restore the checkbox state if needed.

Select the AutoCAD drawing files to be processed by placing a check next to the desired files in the list box. To process all the files in the folder you can place a check in the folder tree. If you wish you can restrict the files to be included in the batch script to a single folder by checking the "This Folder Only" checkbox.

Create the Batch Script


When you click the Create... button you will see a dialog box that displays the list of files that will be included in the batch script.


If you determine the list is incorrect the Cancel button will return you to the Files window and allow you to modify the selected files. Optionally you can add or remove files in the list, however care must be taken to insure each line entry is a valid drawing file name. When you are satisfied with your selection, press OK to create and save the batch script. After saving you will see a message reminding you to keep the CadTempo viewer open during the batch run. The Restore Logged Data button will be enabled.


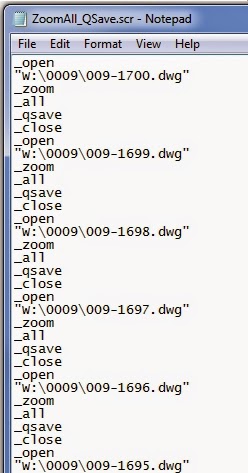
If you wish to make a final examination before running the script open the saved .scr file. This is the result from the example.


After running the script in AutoCAD (or AutoCAD LT) click the Restore Logged Data button.

We are very interested in building a library of common tasks that can benefit from batch processing. If you would like to share a script template you find useful please send us an email with your template for future inclusion with CadTempo.


Wednesday, September 10, 2014

Just Hit Cancel


It's so easy - just hit cancel. We've all done it, whether it's by accident or to avoid having to enter some information a software program is asking for.


It was a problem for a CadTempo user that was attempting to record time spent by his AutoCAD users for non-CAD activities. As easy as CadTempo makes it to account for this time, it's still easier to just hit cancel.


You see, CadTempo works a little differently than your normal, run of the mill time tracking software. After the CAD operator is away from his or her computer for a predetermined time, CadTempo will prompt the user to account for that time upon return. The idea behind this is interruptions that require immediate attention many times remains unaccounted for. With CadTempo's Activity Logging enabled all that is involved is selecting a choice from a drop-down box (and optionally add a description).


But too often his CAD operators just hit cancel.


 My customer (an engineering manager) had the problem of attempting to discover the amount of time users were away from their CAD station. Upon his request a default term was added to CadTempo. Now, when his CAD operators just hit cancel the time will be recorded and he will gain new insight into the performance of his team. It won't deliver quite the impact of knowing what activities took place but with the proper coaching over time I'm confident better accounting will take place.

Activity settings with new default selection


If you are wondering what type of information is recorded here's an example spreadsheet that CadTempo generated. The document that is open during the activity is recorded along with the selected activity name. The user may also include additional information to further describe the activity.


Do you want to get a better understanding of your CAD work time, or your team of CAD operators? If so then visit the CadTempo website to download a fully functioning 30 day trial.


Friday, August 8, 2014

CadTempo 6.2 has been released. Visit www.cadtempo.com and download your 30 day free trial now.


Wednesday, July 2, 2014

Saturday, March 8, 2014

Installing CadTempo For Multiple AutoCAD Users

I recently received an email from a potential CadTempo user with questions I thought might help others. He was interested in knowing how to go about setting up CadTempo for 20 AutoCAD users and 3 administrators (supervisory personnel). So here is an abbreviated set of instructions covering the most important installation points.

You will be installing CadTempo from each user's computer - the target machine(s), but you may find it easiest to first create a folder on a shared network drive. Copy (or best, download) the installer to that folder, and execute the network installer copy from the target machines. The example shown is a shared, mapped drive which resolves to a server name.

Shared Folder Example


During installation you will be prompted to select the type of installation. Subsequent prompting will hinge upon your choice. If you are adding additional users un-check the "Initial Installation" checkbox.

Installation Type Prompt


Our next concern is the component installation. For the initial installation you will select "Full Installation" - this will install both the viewer and the logger (CadTempoView.exe and CadTempo.exe). To add an administrator select "Viewer Installation". If you are adding additional users to be monitored then select "Logger Installation". The Installer will display a message to you if an incorrect selection is made based on your installation type.

Component Selection


Most importantly is the location of the program files and the log files that CadTempo will create. Note that in this example the viewer application is showing the drive letter to the shared network folder and the Logger and Data folders display the server name. It is important when browsing for a location that you navigate to the location from the Network node of the selection dialog box. This will populate the field with the server name.

The folder selection options are dependent upon the components selected. This example is showing the Full Installation and therefore asks for all locations. When you perform a Viewer or Logger Installation only those selection options are presented, also you will be selecting the File rather than Folder. The Data Log File Location only appears for the Full Installation.

CadTempo File Locations


When you have completed the Setup you will be prompted to start the program(s). If you will be installing additional users it is best to postpone this final step until all users have had the software installed however, in order for monitoring and logging to begin, each user should log out then back in.

There are additional steps throughout the setup routine. You can view the full installation guide at this link: Multiple User Install Guide.pdf

Finally, keep in mind that CadTempo may not log the activities you are interested in immediately. You may wish to open the viewer program and make adjustments in the Options section. In particular the Applications and File Types tab. CadTempo also is dependent upon monitored file types and applications being opened and closed. If you find after some time goes by and no time values are being displayed it is most likely due to monitored programs continuing to run on the target machines.