Showing posts with label CadTempo - Instructional. Show all posts

Wednesday, March 21, 2018

It's time to renew some blogging to update you on a number of CadTempo developments

But first a couple of videos to demonstrate just a bit of CadTempo's features

Do you ever need to go back a week or two (or even more) to see what drawings or other documents you worked on? Of course you do. Make it easy on yourself by using CadTempo.


Do you struggle to find out how much time you or your CAD department has spent on a project? CadTempo can answer in less than a minute.


CadTempo records all of these times automatically. You and your users do not need to start or stop  timers or documenting the file or projects worked on. Concentrate on getting that work done. 

Monday, March 2, 2015

Tweaking AutoCAD, BricsCAD, Inventor, and Windows to Improve CadTempo's CAD Time Keeping


There are a few things that can be tweaked so CadTempo can do its best in keeping track of your CAD file time.

Windows hides file name extensions, but making them visible helps CadTempo in file name discovery.

To show file name extensions in Windows Explorer

  1. Open Folder Options by clicking the Start button , click Control Panel, then click Folder Options.
  2. Click the View tab, and then, under Advanced settings:
    • To show file name extensions, clear the Hide extensions for known file types check box, and then click OK.


AutoCAD too can be optimized for CAD file name detection by displaying the full path in the AutoCAD window title bar like this:


To show the full path in AutoCAD's title bar


  1. Open AutoCAD Options by right clicking in the AutoCAD command line or typing Options.
  2. Click the Open and Save tab, and then, under File Open settings, check the Display full path in title and then click OK or Apply.


To show the full path in BricsCAD's title bar


  1. BricsCAD uses the system variable ShowFullPathInTitle. Type that in the command line and set the value to 1.


Autodesk's Inventor does not have a convenient option to set as does AutoCAD, but thanks to a tip discovered on the CADforum by CAD Studio cadforum - how to display full document path in inventor title bar it is possible to do so.

To show the full path in Inventor's title bar

iLogic code is no longer required for CadTempo to function properly with Inventor. (Updated 05/04/2020)

To display a full document path (subfolders) in the Inventor window titlebar, you can use a simple iLogic macro.

  1. Use iLogic to define a new rule (name it e.g. "LongCap") containing a single line: ThisApplication.Caption = ThisDoc.Path
  2. Then let the rule "LongCap" run/invoke (see Event triggers) automatically on each event of the type "Document open".
Since I do not have a copy of Inventor I asked a favorite blogging friend Paul Munford to confirm this works and indeed it does. Thanks Paul and of course CADforum.


Monday, October 13, 2014

Creating a Batch Script for AutoCAD with CadTempo

Have you ever found yourself with a large number of AutoCAD drawings that you need to make changes to? It can be a very tedious and time consuming task.


AutoCAD comes equipped with a number of tools that can address this situation. The most simple of these is the script file - which also works with AutoCAD LT. I've used this method many times in the past to process hundreds of drawings at a time. When left to its own devices, the editing time that CadTempo had captured for those drawings was lost. In order to eliminate that problem a script generator was added to CadTempo. This article describes how to create a batch script within CadTempo and reclaim that logged time.


First, we need to enable and display the script maker. Open the CadTempo viewer and navigate to Options, then the Setting tab. Check the checkbox labeled Show Script Maker as shown in the image. *If you operate a different CAD program this will not be enabled. If your CAD program has scripting available please let us know and we will investigate adding its functioning.*


The AutoCAD Script Maker will now be visible when you return to the Files window and you can begin creating your AutoCAD script template.


CadTempo populates the script edit box with a basic script template. You can modify this script to suit your needs, or load a previously saved template. You'll notice there is a placeholder named Filename. When the batch script is created this will be replaced with the drawing names that you select for processing. Once you have determined the script template is functioning properly in AutoCAD you can save the template for future use.

Select the Drawing Files

If you already have multiple folders checked for other viewing or reporting purposes, you can save the current check list for later reloading. From the main menu bar go to File>>Save Check List. Now you can click the Clear Checked button. The button label will change to "Oops..." to immediately restore the checkbox state if needed.

Select the AutoCAD drawing files to be processed by placing a check next to the desired files in the list box. To process all the files in the folder you can place a check in the folder tree. If you wish you can restrict the files to be included in the batch script to a single folder by checking the "This Folder Only" checkbox.

Create the Batch Script


When you click the Create... button you will see a dialog box that displays the list of files that will be included in the batch script.


If you determine the list is incorrect the Cancel button will return you to the Files window and allow you to modify the selected files. Optionally you can add or remove files in the list, however care must be taken to insure each line entry is a valid drawing file name. When you are satisfied with your selection, press OK to create and save the batch script. After saving you will see a message reminding you to keep the CadTempo viewer open during the batch run. The Restore Logged Data button will be enabled.


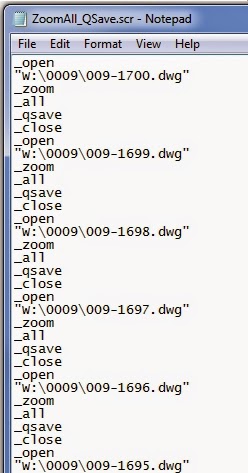
If you wish to make a final examination before running the script open the saved .scr file. This is the result from the example.


After running the script in AutoCAD (or AutoCAD LT) click the Restore Logged Data button.

We are very interested in building a library of common tasks that can benefit from batch processing. If you would like to share a script template you find useful please send us an email with your template for future inclusion with CadTempo.


Wednesday, September 10, 2014

Just Hit Cancel


It's so easy - just hit cancel. We've all done it, whether it's by accident or to avoid having to enter some information a software program is asking for.


It was a problem for a CadTempo user that was attempting to record time spent by his AutoCAD users for non-CAD activities. As easy as CadTempo makes it to account for this time, it's still easier to just hit cancel.


You see, CadTempo works a little differently than your normal, run of the mill time tracking software. After the CAD operator is away from his or her computer for a predetermined time, CadTempo will prompt the user to account for that time upon return. The idea behind this is interruptions that require immediate attention many times remains unaccounted for. With CadTempo's Activity Logging enabled all that is involved is selecting a choice from a drop-down box (and optionally add a description).


But too often his CAD operators just hit cancel.


 My customer (an engineering manager) had the problem of attempting to discover the amount of time users were away from their CAD station. Upon his request a default term was added to CadTempo. Now, when his CAD operators just hit cancel the time will be recorded and he will gain new insight into the performance of his team. It won't deliver quite the impact of knowing what activities took place but with the proper coaching over time I'm confident better accounting will take place.

Activity settings with new default selection


If you are wondering what type of information is recorded here's an example spreadsheet that CadTempo generated. The document that is open during the activity is recorded along with the selected activity name. The user may also include additional information to further describe the activity.


Do you want to get a better understanding of your CAD work time, or your team of CAD operators? If so then visit the CadTempo website to download a fully functioning 30 day trial.


Saturday, March 8, 2014

Installing CadTempo For Multiple AutoCAD Users

I recently received an email from a potential CadTempo user with questions I thought might help others. He was interested in knowing how to go about setting up CadTempo for 20 AutoCAD users and 3 administrators (supervisory personnel). So here is an abbreviated set of instructions covering the most important installation points.

You will be installing CadTempo from each user's computer - the target machine(s), but you may find it easiest to first create a folder on a shared network drive. Copy (or best, download) the installer to that folder, and execute the network installer copy from the target machines. The example shown is a shared, mapped drive which resolves to a server name.

Shared Folder Example


During installation you will be prompted to select the type of installation. Subsequent prompting will hinge upon your choice. If you are adding additional users un-check the "Initial Installation" checkbox.

Installation Type Prompt


Our next concern is the component installation. For the initial installation you will select "Full Installation" - this will install both the viewer and the logger (CadTempoView.exe and CadTempo.exe). To add an administrator select "Viewer Installation". If you are adding additional users to be monitored then select "Logger Installation". The Installer will display a message to you if an incorrect selection is made based on your installation type.

Component Selection


Most importantly is the location of the program files and the log files that CadTempo will create. Note that in this example the viewer application is showing the drive letter to the shared network folder and the Logger and Data folders display the server name. It is important when browsing for a location that you navigate to the location from the Network node of the selection dialog box. This will populate the field with the server name.

The folder selection options are dependent upon the components selected. This example is showing the Full Installation and therefore asks for all locations. When you perform a Viewer or Logger Installation only those selection options are presented, also you will be selecting the File rather than Folder. The Data Log File Location only appears for the Full Installation.

CadTempo File Locations


When you have completed the Setup you will be prompted to start the program(s). If you will be installing additional users it is best to postpone this final step until all users have had the software installed however, in order for monitoring and logging to begin, each user should log out then back in.

There are additional steps throughout the setup routine. You can view the full installation guide at this link: Multiple User Install Guide.pdf

Finally, keep in mind that CadTempo may not log the activities you are interested in immediately. You may wish to open the viewer program and make adjustments in the Options section. In particular the Applications and File Types tab. CadTempo also is dependent upon monitored file types and applications being opened and closed. If you find after some time goes by and no time values are being displayed it is most likely due to monitored programs continuing to run on the target machines.


Monday, September 23, 2013

CadTempo - Creating Project Reports


Creating reports of your designers and drafters project time involvement is easy as pie. Here I'll show you the steps that are involved.

CadTempo is designed such that if your projects are broken into directories and sub-directories, project time totals can be summed easily by navigating to the desired folder and checking the files in that directory.

In the case I am demonstrating, I recently completed a small AutoCAD design and detail project of a tooling package. The project consisted of an AutoCAD assembly model constructed with 3D solids, the detailed AutoCAD drawings, an isometric drawing of the assembly and an Excel spreadsheet of the Bill of Material.

When you open the CadTempo viewer application it defaults to the file listing of the last folder you had open in the viewer. Navigate to the desired project folder and check the files in that directory. You can filter the displayed files by designating a filter mask then checking the Apply Filter box. Only visible and checked files will be included in the report.


Now, click the Folder Contents button.


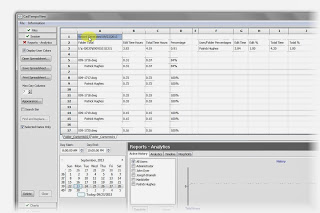
Navigate to the Reports - Analytics page to view the report.


For a more detailed report return to the Files page and check the Include User Data box, then click the Folder Contents button once more.


Return to the Reports - Analytics page and you will see each user's time is added to a new spreadsheet page.


From the Reports - Analytics page you can print the report - you will need to print each spreadsheet page individually - or save the report to an Excel spreadsheet. Other save options include an html, rtf, and xml file types.

You can continue to add additional projects to the report - simply return to the Files page and navigate to other folders that you wish to include in your reports. Each time you click the Folder Contents button a new spreadsheet page is created.

So there you have it. Did I say it was easy as pie? Perhaps I understated the case.

Tuesday, August 13, 2013

CadTempo Display Timer

I'm often asked how the timer functions in CadTempo work. I'll explain the basic timers in this article and in a future article I will describe the advanced timing functions that are a part of the new analytics in CadTempo version 6.
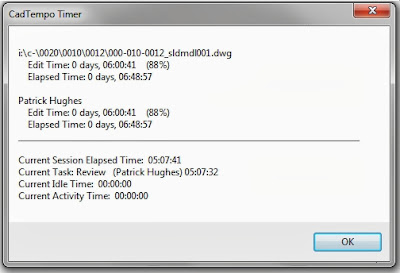


The CadTempo Timer Display


You will note that in this image the optional Task Timer and Activity Timers are enabled and displayed because "Extended Display" is selected as an option within the CadTempoView program allowing the user to view the current information. You can use this display to observe the timing functions of your CadTempo installation - see the help file for further instructions, this is found under: Contents>>CadTempo.exe>>Display Timer.

Let's begin by examining the information that is displayed in the lower section of the display.

Current Session Elapsed Time:

Session Time

You might think of the Session Timer as a time punch clock that you punch in as you begin your day in the morning and punch out when your day is over. But there is a major difference, the CadTempo session timer is started automatically - there is no time clock to punch in or out of.

The CadTempo application is started automatically when the user logs onto the computer. When CadTempo detects that a monitored production application is started, the Session Timer is started and begins its tally. Any monitored production application will start the timer so if you have selected to monitor AutoCAD, Inventor, or Solidworks any of those programs will start the timer. The Session Time will continue to increment while any of the monitored programs remain open. Once all monitored production applications are closed the session time is ended and the results are written to the log. You may witness several session times being recorded throughout the day as you open and close your monitored production applications.

Current Task:

Task Time

When enabled, the Task Timer will prompt the user for a task name based on the list within the CadTempoView Options settings window. If the "When Session Begins" check box has been checked the prompt will appear when a monitored application is started. If left un-checked the prompt will appear upon Windows start up. A user is presented with a prompt as shown:


The visibility of the "Display Timer" button is controlled by an option within the CadTempoView program.

The user may select a pre-defined task name using the drop-down combo box or may enter a custom name. When entering a custom name the custom name is remembered during the CadTempo program's life and will continue to appear in the list, but is not added to the persistent pre-defined list.

The user may enter additional information that is specific to the current task.

An alternate user name may be specified. This may be useful if you or a user is performing a task on another user's computer, however the currently logged on user name is also recorded.

By checking the "Re-Prompt" check box the task timer prompt will be re-issued when a session has been completed.

A user may save the current task at any time by clicking the "CadTempo - Task Timer" in the Windows Task bar and selecting the "Finish" button which becomes visible once a task is started. If Re-Prompt is checked the prompt immediately re-appears to allow beginning a new task.

When a Session is ended the Save Task prompt will appear. The user may save the current task or continue with the current task. If a user elects to continue the current task the user will be required to manually perform a save unless there a log-off (or Lock, etc.) occurs. CadTempo will then perform an automatic save.


Current Idle Time:

Idle Time

The Idle Time is based on a user's keystrokes and mouse movement or button click while a monitored production application is the active window. Each input resets the counter and the timer will increment only when there is no input. By itself, the display of the Idle Timer is intended for understanding the functioning of the related time recordings. Its effect on the other timers will be described in their respective explanations.

Current Activity Time:

Activity Time

The idea behind the Activity Timer is to provide the user with a means of capturing extended time that is spent away from the computer. Often, a user may be interrupted during working hours to attend to a related activity such as a meeting or to consult with other departments. Perhaps a user regularly leaves a CAD program and drawing open during lunch hour or a short personal time break.

The Activity Timer is connected to the Idle Timer. You, as the CAD manager control what is acceptable as a reasonable amount of user idle time. Many users will experience momentary interruptions throughout their day, whether it be a client phone call, a restroom break or a needed diversion such as a brief discussion with a co-worker. The default value for this idle time is set to 5 minutes but you can adjust that up or down to your liking in the CadTempoView program.

When a user becomes "idle" the idle timer will begin counting up to the idle limit that is set. Once the idle limit is reached the Activity Timer begins its count up to its limit. The default activity limit is set to 20 minutes and is adjustable. If a user returns to the computer while under the limit and continues work the Activity Timer is reset to zero and the cycle begins anew.

If the activity timer reaches its limit, a prompt is issued and will be visible when the user returns to the computer. In this way a user can account for his extended time away from the computer rather than relying upon his memory at the end of the day or week to enter into a manual time sheet.

Using the default values of 5 minutes for the idle timer and 20 minutes for the activity timer a user can account for 25 minute (and more) of "away" time.


Finally, let's take a look at the document and user timers that are displayed at the top.

Document and User Timers:

Elapsed Time

The elapsed time is the total amount of time a monitored document type is open and has keyboard and mouse focus. The document may be an AutoCAD drawing, a Revit file, Inventor file or any number of file types you designate and associated with a monitored production application. This value will continuously increment while a document is open. When a user switches to another monitored production application the timer will immediately switch over along with the user and begin (or continue) timing the now current document. Each document retains its own elapsed time as well as the user time of that document.

Multiple users that access the same document are recorded independently and the document time is the accumulated amount of all users.

Edit Time

The edit time is the amount of time a user maintains keyboard and mouse activity within a known document type of a monitored production application. The edit time is affected by the idle timer. If a user is momentarily interrupted, the idle time, up to its limit is considered to be valid editing time. In this way a user is not penalized (not that they should be in any event) for brief periods of inactivity. There are of course many reasonable causes for these periods of idle time.

The resulting difference between Elapsed Time and Edit Time can be used as an indication of efficiency or productivity.

In summary, there is much going on within the CadTempo program to monitor your user activites and to document the time involved in various tasks. It can take a while to understand exactly how CadTempo functions and my hope is that I've described them to your satisfaction.